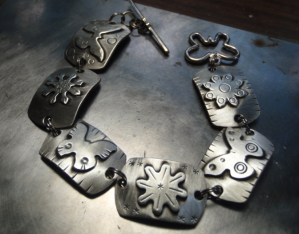
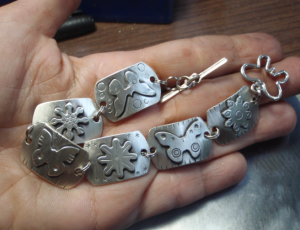

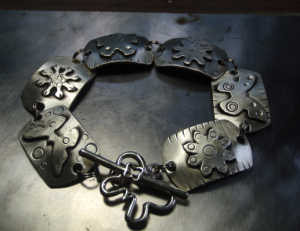
Today I am posting another tutorial . I made a link bracelets with soldered on flowers and butterflies .ts made from sterling silver ( 18 gauge and 20 gauge ) .By the way silver prices are way down right now so if you need to buy sterling do it now !!
What you need for this project : 1 jewelry saw with 1/0 saw blades , 18 and 20 gauge sterling silver , Split rings , clasp , silver solder , a torch , some gas for your torch , a charcoal block or heat tile, Flux, water for quenching , pinzette , copper tongues , pickle solution , flex shaft , polisher , liver of sulfur , some pliers ( flat nose and needle nose ) , chasing tools , a hammer , a nylon hammer ,dapping block and the punches , hole punch pliers or drill
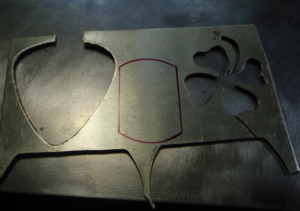


draw your base shape onto 18 gauge sterling silver ( you can also use copper , bronze or brass if sterling is too expensive ) .I drew a rounded dog tag pendant shape in a 3/4 inch size .You can make any base shape you like , remember it is your bracelet and I just point you into the direction on how to make it

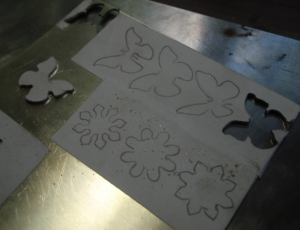
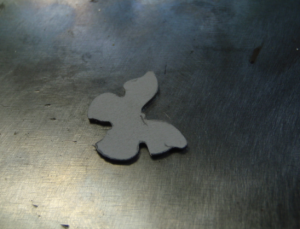
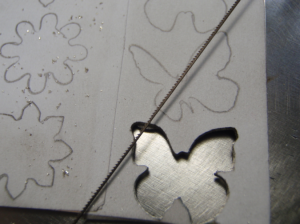
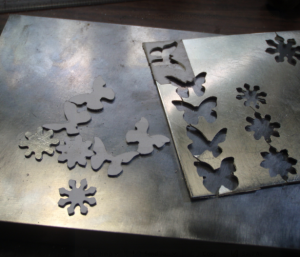
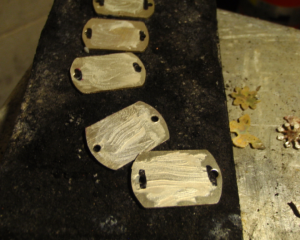
. I drew and cut out 6 shapes which in the end will make a bracelet of about 6 1/2 – 7 inches . I used a jewelry hand saw with 1/0 blades . Those blades are very thin and will brake very easy . The way on how to properly saw is to not “push ” your saw through the metal . You need to let the saw do the work . Lock your wrist and move your arm from the elbow up and down . If you do a lot of sawing you will feel it in your upper arm !! To make the saw move easier you can either use burr life or bees wax to wax your blade ( I use bees wax , its organic and non toxic -I try to use as much from nature as I can as metal smithing uses a lot of chemicals and non natural stuff ) . After you cut out your base shape you can draw some other shapes on paper -I use label paper as i don’t need to use glue , it sticks on its own – make sure that your shapes are smaller then your rectangles . Transfer or stick your paper onto a 20 gauge sterling silver sheet . Again I use label paper so I don’t have to worry about glue and waiting for the glue to dry . Cut out your shapes ( butterflies and flowers for the bracelet I made )

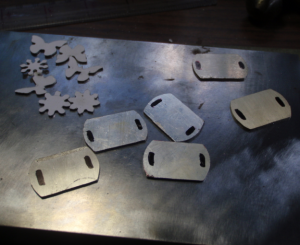
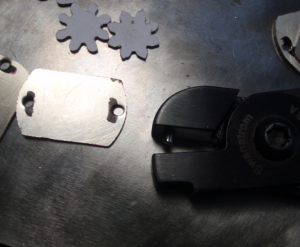
Again make sure that the shapes that will be soldered to your base are smaller than the base shape . Now is the best time for your holes. I use a hole punch pliers from swanstrom with a 2.5mm hole punch for bigger holes . You might need a bit of a strong hand for that . The bigger the hole you are punching the more strength you need. Keep your punch well lubed too that will help also.
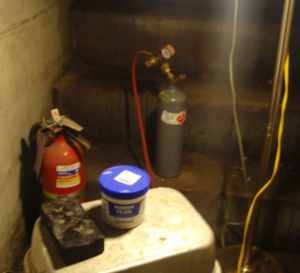

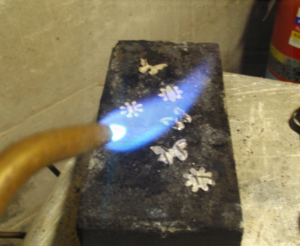
Now comes the part with the fire and the flames . Remove all paper from your pieces . Yes some say you can burn them off ,but don’t…just don’t…. I clean my metal before soldering with the flex shaft really quick so I know that the metal is clean to solder. The picture above is my set up here in New Jersey with my soldering station . Its an old bar stool, a flipped over tin box that was fixed to the bar stool with some nails . I use a charcoal block for soldering as the charcoal will glow and burn retaining the heat from the torch and reflect it back to your pieces making it easier to solder .
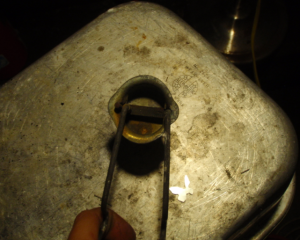
Ok on we go . Apply Flux to the side were you want to have your solder ( back of the pieces you cut out ) . Flux is used to make the solder flow and to protect from fire scale and oxidation . I use paste Flux but there are different kinds. Apply your solder – On my pictures you see the little wire sticks ? That is the solder I use . Wire solder ( there are again many different kind , like paste solder , stick solder , gel solder sheet solder ) The solder I mostly use is extra easy wire solder ( 60% silver content ) because it has the lowest melt temperature .
After You have done that use your torch – I have an Acetylene / Air torch system that means I have one tank . Most use an Acetylene/ Oxygen torch system , meaning you have 2 tanks , one with oxygen and one with the acetylene . I am very hesitant to do that . having pure oxygen next to a gas tank is just really creepy to me and for my purposes the Acetylene / Air works perfectly .
Heat your pieces one after another and make the solder flow , this will happen fairly quickly with smaller pieces . i don’t get mine red hot ( red hot means the red color your metal gets right before it melts into a big lump ) due to the low flow extra easy solder . After all the solder is bonded with your pieces , quench them really quick in water

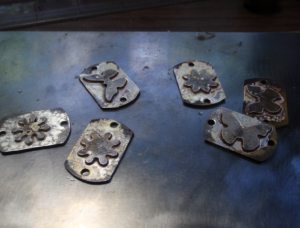
this is how it will it look after your solder flowed
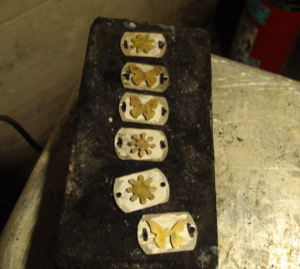
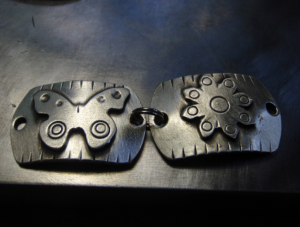
Apply flux to your bottom pieces ( rectangles in my case ) and put your top shapes with the soldered side down onto the rectangles . Start heating again with the torch until you see a fine silvery liquid line around the shapes ( I use a soldering stick or a pinchette to press lightly to make sure I have no gaps ) Quench in water again . Never touch your soldered things before quenching . You will burn a hole right through you !! Pick them up with pinchettes or tongues and then quench in water .
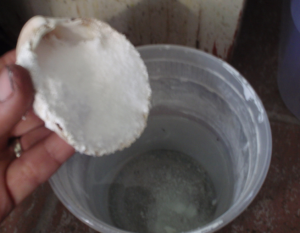

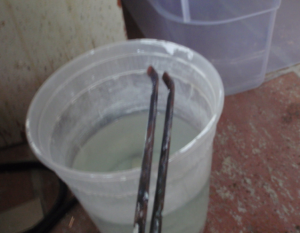

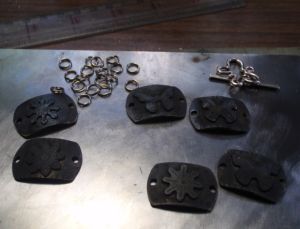
After soldering your metal will be discolored and mostly dark black , that is due to oxidation from soldering and heating your metal . You can clean your metal in a “Pickle ” solution . You can buy the salt in any jewelry supply store , I get mine from riogrande.com . You need a plastic or ceramic container or bowl . Add the salt / grain to water . Now instructions say use it in a warm solution ( crock pot ) . I don’t do that . yes t will takea bit longer to get clean , but I am scatter brained and will forget to shut the crock pot off thus making it a fire hazard . I use it at air temperature and it has been working will for me. Put your metal in the solution and check frequently . When the sterling looks white you can take it out . Always use copper tongues to remove from the pickle -NEVER with your bare hands – that solution is an acid and will leave burns . Wash your hands or any other skin that comes in contact with the solution . Also do not use a different metal then copper to get things out as the metal will react to the copper ions in the solution and then those copper particles will cling to your pieces making it very hard to clean.
After taking them out ash in water and dry.


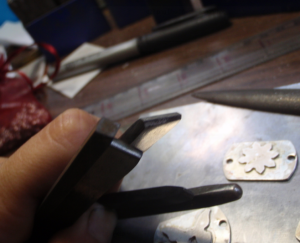

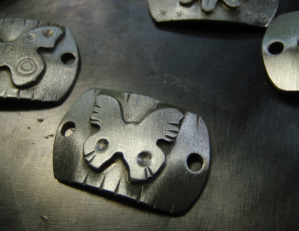
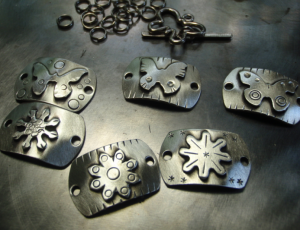
Polish the edges or file the edges nice and smooth .Use any chasing tools or anything you can find to create some texture ( screw drivers work very well and nails )


After you are done with your texture you can form your pieces or you can leave them flat . If you form the you may use a dapping block ( hardened steel with round indentations and balls on sticks ( lol ) the corresponding hammers . Dome your pieces in the dapping block .You put the rectangle face down inside a indentation , take the corresponding hammer and put on top of your rectangle . Pound the end of the hammer with a nylon hammer ( don’t use steel on steel , you can also use a raw hide mallet . After you are done doming . Run through your polisher or use the flex shaft . Remove any remaining oxidation and fire scale.


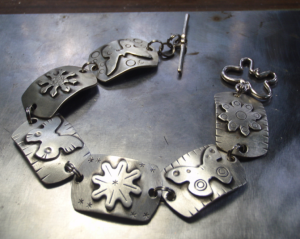
Add patina (liver of sulfur bath ) and polish again , leaving the texture black .Now you need your split rings and your clasp. I use split rings because I am lazy .Yes I admit it . You can use Jump rings but you will have to solder them close so that you will not brake the bracelet . With Split rings you do not have to worry about them opening on you . Combine your rectangles with your components an add the clasp .Polish by hand to remove any finger prints . And you are done )


I would say this is a intermediate level in metalsmithing
hope you liked it , come by and visit my shop at
www.nicilaskin.etsy.com


 Today I am posting another tutorial . I made a link bracelets with soldered on flowers and butterflies .ts made from sterling silver ( 18 gauge and 20 gauge ) .By the way silver prices are way down right now so if you need to buy sterling do it now !!
What you need for this project : 1 jewelry saw with 1/0 saw blades , 18 and 20 gauge sterling silver , Split rings , clasp , silver solder , a torch , some gas for your torch , a charcoal block or heat tile, Flux, water for quenching , pinzette , copper tongues , pickle solution , flex shaft , polisher , liver of sulfur , some pliers ( flat nose and needle nose ) , chasing tools , a hammer , a nylon hammer ,dapping block and the punches , hole punch pliers or drill
Today I am posting another tutorial . I made a link bracelets with soldered on flowers and butterflies .ts made from sterling silver ( 18 gauge and 20 gauge ) .By the way silver prices are way down right now so if you need to buy sterling do it now !!
What you need for this project : 1 jewelry saw with 1/0 saw blades , 18 and 20 gauge sterling silver , Split rings , clasp , silver solder , a torch , some gas for your torch , a charcoal block or heat tile, Flux, water for quenching , pinzette , copper tongues , pickle solution , flex shaft , polisher , liver of sulfur , some pliers ( flat nose and needle nose ) , chasing tools , a hammer , a nylon hammer ,dapping block and the punches , hole punch pliers or drill


 draw your base shape onto 18 gauge sterling silver ( you can also use copper , bronze or brass if sterling is too expensive ) .I drew a rounded dog tag pendant shape in a 3/4 inch size .You can make any base shape you like , remember it is your bracelet and I just point you into the direction on how to make it

 Again make sure that the shapes that will be soldered to your base are smaller than the base shape . Now is the best time for your holes. I use a hole punch pliers from swanstrom with a 2.5mm hole punch for bigger holes . You might need a bit of a strong hand for that . The bigger the hole you are punching the more strength you need. Keep your punch well lubed too that will help also.


 Now comes the part with the fire and the flames . Remove all paper from your pieces . Yes some say you can burn them off ,but don’t…just don’t…. I clean my metal before soldering with the flex shaft really quick so I know that the metal is clean to solder. The picture above is my set up here in New Jersey with my soldering station . Its an old bar stool, a flipped over tin box that was fixed to the bar stool with some nails . I use a charcoal block for soldering as the charcoal will glow and burn retaining the heat from the torch and reflect it back to your pieces making it easier to solder .
Ok on we go . Apply Flux to the side were you want to have your solder ( back of the pieces you cut out ) . Flux is used to make the solder flow and to protect from fire scale and oxidation . I use paste Flux but there are different kinds. Apply your solder – On my pictures you see the little wire sticks ? That is the solder I use . Wire solder ( there are again many different kind , like paste solder , stick solder , gel solder sheet solder ) The solder I mostly use is extra easy wire solder ( 60% silver content ) because it has the lowest melt temperature .
After You have done that use your torch – I have an Acetylene / Air torch system that means I have one tank . Most use an Acetylene/ Oxygen torch system , meaning you have 2 tanks , one with oxygen and one with the acetylene . I am very hesitant to do that . having pure oxygen next to a gas tank is just really creepy to me and for my purposes the Acetylene / Air works perfectly .
Heat your pieces one after another and make the solder flow , this will happen fairly quickly with smaller pieces . i don’t get mine red hot ( red hot means the red color your metal gets right before it melts into a big lump ) due to the low flow extra easy solder . After all the solder is bonded with your pieces , quench them really quick in water
Now comes the part with the fire and the flames . Remove all paper from your pieces . Yes some say you can burn them off ,but don’t…just don’t…. I clean my metal before soldering with the flex shaft really quick so I know that the metal is clean to solder. The picture above is my set up here in New Jersey with my soldering station . Its an old bar stool, a flipped over tin box that was fixed to the bar stool with some nails . I use a charcoal block for soldering as the charcoal will glow and burn retaining the heat from the torch and reflect it back to your pieces making it easier to solder .
Ok on we go . Apply Flux to the side were you want to have your solder ( back of the pieces you cut out ) . Flux is used to make the solder flow and to protect from fire scale and oxidation . I use paste Flux but there are different kinds. Apply your solder – On my pictures you see the little wire sticks ? That is the solder I use . Wire solder ( there are again many different kind , like paste solder , stick solder , gel solder sheet solder ) The solder I mostly use is extra easy wire solder ( 60% silver content ) because it has the lowest melt temperature .
After You have done that use your torch – I have an Acetylene / Air torch system that means I have one tank . Most use an Acetylene/ Oxygen torch system , meaning you have 2 tanks , one with oxygen and one with the acetylene . I am very hesitant to do that . having pure oxygen next to a gas tank is just really creepy to me and for my purposes the Acetylene / Air works perfectly .
Heat your pieces one after another and make the solder flow , this will happen fairly quickly with smaller pieces . i don’t get mine red hot ( red hot means the red color your metal gets right before it melts into a big lump ) due to the low flow extra easy solder . After all the solder is bonded with your pieces , quench them really quick in water
 this is how it will it look after your solder flowed


 Apply flux to your bottom pieces ( rectangles in my case ) and put your top shapes with the soldered side down onto the rectangles . Start heating again with the torch until you see a fine silvery liquid line around the shapes ( I use a soldering stick or a pinchette to press lightly to make sure I have no gaps ) Quench in water again . Never touch your soldered things before quenching . You will burn a hole right through you !! Pick them up with pinchettes or tongues and then quench in water .


 After soldering your metal will be discolored and mostly dark black , that is due to oxidation from soldering and heating your metal . You can clean your metal in a “Pickle ” solution . You can buy the salt in any jewelry supply store , I get mine from riogrande.com . You need a plastic or ceramic container or bowl . Add the salt / grain to water . Now instructions say use it in a warm solution ( crock pot ) . I don’t do that . yes t will takea bit longer to get clean , but I am scatter brained and will forget to shut the crock pot off thus making it a fire hazard . I use it at air temperature and it has been working will for me. Put your metal in the solution and check frequently . When the sterling looks white you can take it out . Always use copper tongues to remove from the pickle -NEVER with your bare hands – that solution is an acid and will leave burns . Wash your hands or any other skin that comes in contact with the solution . Also do not use a different metal then copper to get things out as the metal will react to the copper ions in the solution and then those copper particles will cling to your pieces making it very hard to clean.
After taking them out ash in water and dry.
After soldering your metal will be discolored and mostly dark black , that is due to oxidation from soldering and heating your metal . You can clean your metal in a “Pickle ” solution . You can buy the salt in any jewelry supply store , I get mine from riogrande.com . You need a plastic or ceramic container or bowl . Add the salt / grain to water . Now instructions say use it in a warm solution ( crock pot ) . I don’t do that . yes t will takea bit longer to get clean , but I am scatter brained and will forget to shut the crock pot off thus making it a fire hazard . I use it at air temperature and it has been working will for me. Put your metal in the solution and check frequently . When the sterling looks white you can take it out . Always use copper tongues to remove from the pickle -NEVER with your bare hands – that solution is an acid and will leave burns . Wash your hands or any other skin that comes in contact with the solution . Also do not use a different metal then copper to get things out as the metal will react to the copper ions in the solution and then those copper particles will cling to your pieces making it very hard to clean.
After taking them out ash in water and dry.


 Polish the edges or file the edges nice and smooth .Use any chasing tools or anything you can find to create some texture ( screw drivers work very well and nails )


 After you are done with your texture you can form your pieces or you can leave them flat . If you form the you may use a dapping block ( hardened steel with round indentations and balls on sticks ( lol ) the corresponding hammers . Dome your pieces in the dapping block .You put the rectangle face down inside a indentation , take the corresponding hammer and put on top of your rectangle . Pound the end of the hammer with a nylon hammer ( don’t use steel on steel , you can also use a raw hide mallet . After you are done doming . Run through your polisher or use the flex shaft . Remove any remaining oxidation and fire scale.


 Add patina (liver of sulfur bath ) and polish again , leaving the texture black .Now you need your split rings and your clasp. I use split rings because I am lazy .Yes I admit it . You can use Jump rings but you will have to solder them close so that you will not brake the bracelet . With Split rings you do not have to worry about them opening on you . Combine your rectangles with your components an add the clasp .Polish by hand to remove any finger prints . And you are done )


 I would say this is a intermediate level in metalsmithing
hope you liked it , come by and visit my shop at www.nicilaskin.etsy.com
I would say this is a intermediate level in metalsmithing
hope you liked it , come by and visit my shop at www.nicilaskin.etsy.com